
Crafting a lectern can be a rewarding and fulfilling project for those who enjoy working with their hands. If you’re wondering how to craft a lectern, I’ll guide you through the process step by step. Whether you need a lectern for public speaking engagements or simply want to add an elegant piece of furniture to your home, this article will provide you with all the information you need.
To begin crafting your own lectern, it’s important to gather the necessary materials and tools. You’ll need wood boards of your choice, measuring tape, saws (such as a circular saw or jigsaw), screws or nails, sandpaper, wood glue, and varnish or paint for finishing touches. Once you have everything ready, measure and cut the boards according to your desired dimensions.
Next, assemble the pieces using screws or nails along with some wood glue for added stability. Ensure that each joint is secure before moving on to the next step. After assembling the main structure of the lectern, it’s time to sand down any rough edges and apply a coat of varnish or paint to achieve your desired finish.
How To Craft Lectern
When it comes to crafting a lectern, selecting the right wood is crucial. The choice of wood can greatly impact not only the appearance but also the durability and functionality of your lectern. Here are some key points to consider when choosing the perfect wood for your project:
- Strength and Stability: Opt for a hardwood that offers excellent strength and stability to ensure that your lectern will withstand regular use and remain sturdy over time. Popular hardwood options include oak, maple, cherry, and mahogany.
- Appearance: Consider the aesthetic appeal you want to achieve with your lectern. Different woods have distinct grains, colors, and finishes that can enhance the overall look of your piece. For a classic and timeless look, oak or mahogany are excellent choices. If you prefer a lighter tone, maple or cherry may be more suitable.
- Durability: Lecterns often endure heavy usage in various environments such as lecture halls or conference rooms. Therefore, it’s important to choose a wood species known for its durability. Oak and maple are particularly renowned for their robustness and resistance to wear and tear.
- Workability: Depending on your woodworking skills and tools available, consider how easily you can work with the chosen wood species. Some woods are easier to shape, cut, drill, or sand than others. If you’re new to woodworking or have limited tools at hand, opting for a forgiving wood like pine could be beneficial.
- Budget: Keep in mind that different types of wood come with varying price tags due to availability and desirability factors. While high-end options like mahogany may be more expensive, there are budget-friendly alternatives such as pine or plywood that can still yield satisfactory results without breaking the bank.
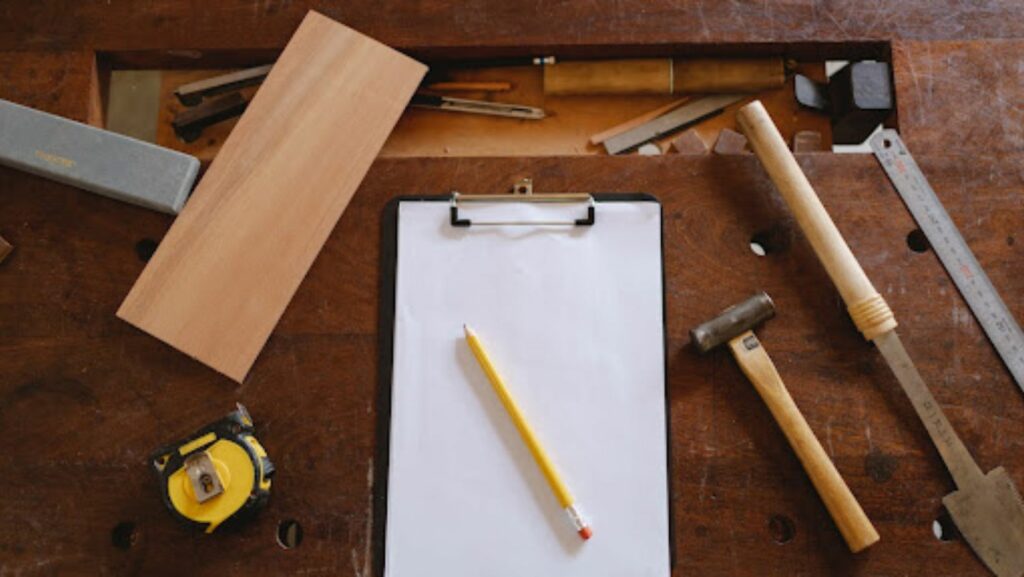
 Essential Tools And Materials Needed
 Essential Tools And Materials Needed
When it comes to crafting a lectern, having the right tools and materials at your disposal is crucial. In this section, I’ll outline the essential items you’ll need to bring your vision to life.
- Wood: Start by selecting a sturdy and durable wood that suits your taste and budget. Popular choices include oak, pine, or birch. Make sure the wood is of good quality and free from defects.
- Measuring Tools: Accurate measurements are key for a well-crafted lectern. Arm yourself with measuring tools such as a tape measure, ruler, and combination square to ensure precise cuts and alignments.
- Saw: A reliable saw is essential for cutting the wooden pieces to size. Depending on your preference and expertise, you can choose between a circular saw or a miter saw for straight or angled cuts respectively.
- Power Drill: A power drill will be invaluable during assembly. Opt for one with adjustable speed settings and various drill bit sizes to accommodate different tasks like creating pilot holes or countersinking screws.
- Sanding Tools: Smooth out rough edges and achieve a professional finish with sanding tools like sandpaper or an orbital sander. Choose different grits depending on the level of smoothness desired.
Stay tuned for more expert tips!