
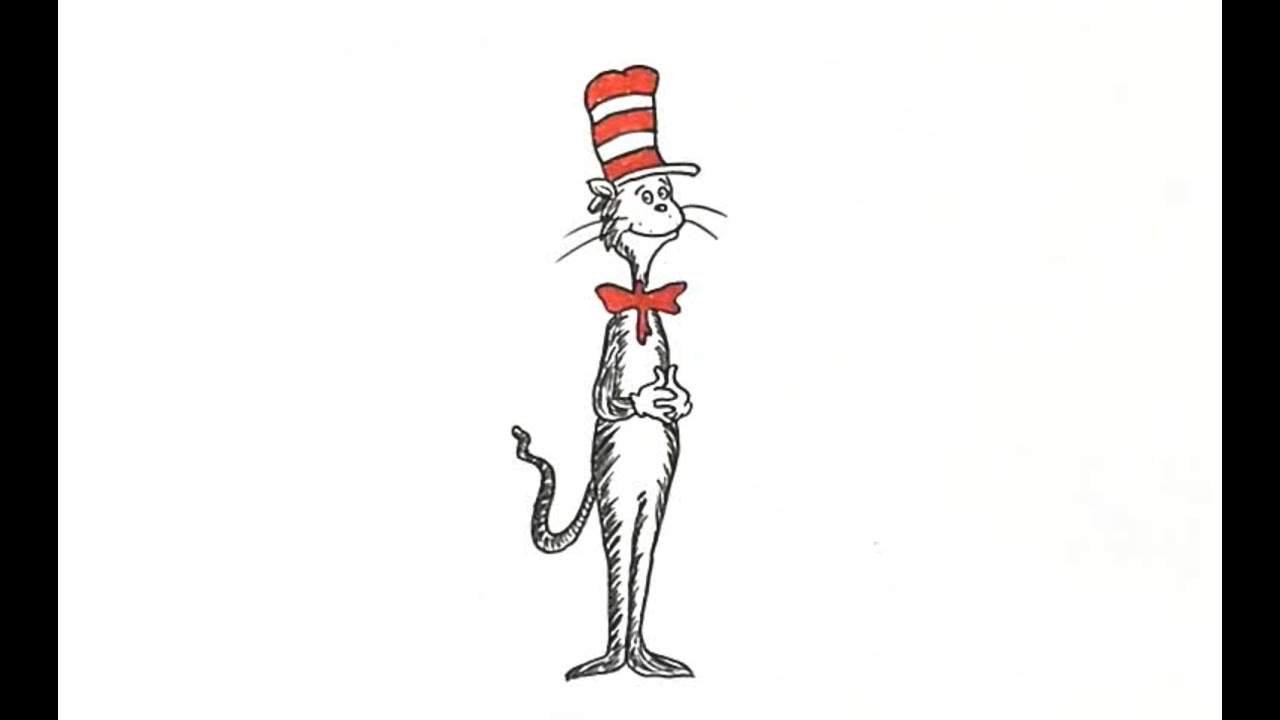
Are you a fan of the popular children’s book “The Cat in the Hat”? Would you like to learn how to draw this iconic character? Look no further! In this tutorial, I’ll be showing you how to draw Cat in the Hat step by step.
To get started, you’ll need a piece of paper, a pencil, and an eraser. Take your time and follow along with each step carefully. Don’t worry if it’s not perfect – the more you practice, the better you’ll become at drawing.
First, let’s draw the Cat’s head. Start by drawing a large oval shape in the center of your paper. Then, draw another smaller oval shape inside the first one. This will be the Cat’s face. Next, draw two triangle-shaped ears on top of the head.
Sketching the Cat in the Hat
Starting with a rough sketch of the basic shapes required for our Cat in the Hat drawing will make the process smoother. By following these simple steps, anyone can learn how to draw Cat in the Hat with ease.
Step 1: Drawing the Head
The first step is to draw an oval for the head, which will subsequently be the base of our character. Next, draw a vertical line down the center of the oval and a horizontal one for the eyes.
Step 2: Sketching the Hat
Now, we proceed to draw the iconic Cat in the Hat hat. Start by drawing a rectangle above the head, making sure it’s wider than the head. Then, add a few curvy lines to mark the top of the hat and give it that famous floppy look.
Step 3: Adding the Face
After the hat, we need to add the facial details. Sketch a triangle on the nose and add vertical lines to it. Draw two semi-circles on either side for his cute little ears. Then, draw the eyes inside the horizontal line marking and complete the face with the cat’s wide smile.
Step 4: Adding in the Details
To add some depth to the drawing, we can use light and dark tones to give the fur some texture. We can also add stripes to the Cat in the Hat’s hat to make it pop out more.
By following these simple steps, anyone can learn how to draw Cat in the Hat from scratch. Remember, practice makes perfect. Keep practicing your drawing skills, and soon you’ll be able to create your unique Cat in the Hat drawing and show it off to your friends.
Adding Details to the Drawing
Now that we have the basic shapes of Cat in the Hat, it’s time to start adding some details to make our drawing more realistic. Here are a few tips:
1. Draw the Stripes
One of the most distinctive features of Cat in the Hat is his striped hat. Use a ruler or a straight edge to draw straight, even lines from the bottom of the hat to the top. Each stripe should be about the same width and evenly spaced apart. Next, add stripes to his sleeves in the same way.
2. Add the Face
Cat in the Hat has a very expressive face, so it’s important to get it right. Start by drawing two large ovals for his eyes. Inside each eye, draw a smaller circle for the pupils, leaving a small space between the two. Then, draw a small triangle for his nose, and a curved line for his mouth. Finally, add his signature whiskers to each side of his face.
3. Draw the Bowtie
To add the finishing touch to his outfit, draw Cat in the Hat’s bowtie. Start by drawing a small rectangle in the center of his chest. Then, draw two smaller rectangles on either side, making sure they’re angled slightly outward. Connect the three rectangles with two curved lines, and add a small triangle at the center.
4. Shade in the Details
Now that the basic drawing is complete, it’s time to add some shading to make it pop. Use a slightly darker pencil or marker to shade in the stripes on his hat and sleeves, and add some shading under his nose and mouth to give them depth. Finally, use a white pencil or marker to add highlights to his eyes and bowtie.
By following these simple steps, you can create a detailed and realistic drawing of Cat in the Hat. Don’t be afraid to experiment with different styles and techniques until you find one that works for you. Happy drawing!
Shading and Coloring Techniques
With the outline of the “Cat in the Hat” complete, it’s time to add shading and color. When shading, use a pencil or pen to darken areas of the drawing to create the illusion of depth. Here are some techniques to try:
- Hatching and Crosshatching: these techniques involve creating a series of parallel or intersecting lines to shade specific areas. The closer and more numerous the lines, the darker the area will appear.
- Stippling: this technique involves creating tiny dots, to create shading. The more dots you apply, the darker the area will appear.
- Smudging: with this technique, you use your finger, a tissue, or a blending tool to blend the shading to create a smooth transition between the lighter and darker areas. Just be careful not to smudge areas where you don’t want the shading.
When coloring the “Cat in the Hat”, use shades of red and white for the hat, and black and white for the cat. Don’t be afraid to use other colors too, if you want to give the drawing a unique twist. Here are some coloring techniques to try:
- Layering: this technique involves adding multiple layers of the same color to create a deeper, richer tone. Start with a light shade and continue adding darker colors until you achieve the desired color.
- Blending: this technique involves combining two or more colors to create a gradient effect. Experiment with blending different shades until you find the perfect combination.
- Highlighting: use a white pencil or pen to add highlights to the drawing. This will create the illusion of light reflecting off the object.
With these shading and coloring techniques, you can bring your “Cat in the Hat” drawing to life. Just remember to take your time and practice, practice, practice!

Conclusion:
Now that we have gone through the process step by step, I hope you feel more confident in your ability to draw the Cat in the Hat. Remember, practice makes perfect, so don’t be discouraged if your first few attempts don’t come out exactly how you envisioned them.
Drawing is a skill that requires patience and perseverance. With each attempt, you’ll learn something new and eventually, you’ll be able to create your version of the Cat in the Hat.
If you enjoyed this tutorial, I encourage you to explore other drawing techniques not just for cartoon characters but other subject matters as well. You never know what hidden talents and passions you may discover.
So, grab your pencil and paper, and let your creativity flow! With what you have learned here today, I know you’ll be able to draw the Cat in the Hat with ease.
I hope you found this guide informative and helpful. Don’t forget to share your creations with friends and family, as well as on social media. Keep practicing, and soon enough, you’ll be creating your unique versions of this beloved character.