
Drawing is a form of art that requires practice and patience to get better at it. If you are a fan of Dr. Seuss’s books, you might want to know how to draw the classic character ‘The Cat in the Hat.’
Drawing him may seem complicated, but with this simple guide, I’ll show you the steps on how to draw the cat in the hat. All you need is a pencil, eraser, paper, and some colored pens or pencils.
To begin, we’ll start with a simple sketch of the cat’s head and work our way down to the body and limbs. With each step, you’ll see how the character takes shape and how easy it is to create your version of it. So, let’s get started and learn how to draw the cat in the hat in no time!
Materials Needed
To learn how to draw the Cat in the Hat, there are several materials you’ll need to have on hand. Don’t worry, you probably have most of these already!
1. Pencil
Start with an HB or #2 pencil. This will allow you to sketch your initial drawing without making permanent marks on the paper.
2. Eraser
Mistakes happen, so it’s important to have an eraser to correct them. A kneaded eraser is great for drawing because it can be shaped into any form and doesn’t leave residue on the paper.
3. Paper
You can use any type of paper for practice, but for your final piece, use a clean white paper. A heavier weight paper, such as bristol board, will hold up to erasing and support the ink or marker you use for the final lines.
4. Black Marker or Pen
To define your final lines, use a thin black marker or pen. A waterproof and fade-resistant pen is ideal for a quality drawing.
5. Colored Pencils
Once you finish your basic line drawing, add some pizazz with colored pencils. Gather bright and bold colors to accentuate the red and white stripes of the Cat in the Hat’s hat.
Now that you have all of the materials, you’re ready to start drawing the Cat in the Hat. Let’s get started!
Step-By-Step Instructions
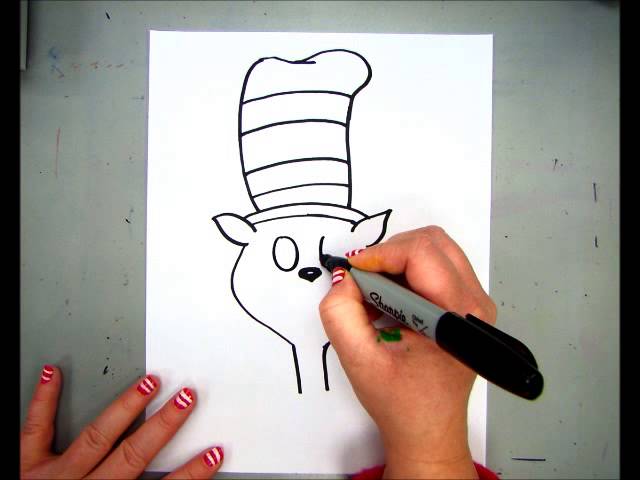
Drawing The Cat in the Hat is a fun and creative way to spend an afternoon! Follow these simple steps and you’ll have a beautiful rendition of Dr. Seuss’ beloved character in no time.
- First, draw a large oval for the head shape. This will be the basis for the body of The Cat in the Hat.
- Next, add two slightly curved lines that meet at the bottom, creating a V shape. This will form the character’s neck.
- To give The Cat in the Hat his signature look, draw the brim of the hat right above the oval for the head. The brim should be wavy and jagged, just like in the books!
- Continuing with the hat, add a tall cylinder shape above the brim. This is where the top hat part of the hat will sit.
- Add the stripes of the hat by drawing several parallel and wavy lines across the cylinder shape. Leave some blank space between the lines to create the white stripes.
- Draw two tiny lines for eyebrows above the eyes.
- Add the eyes, which are ovals with the top part shaded in. Draw the pupils as small circles near the bottom of each oval.
- Below the eyes, draw a small black triangle for the nose.
- Add the mouth with a small curve underneath the nose.
- Sketch in the outline of the body by drawing two vertical lines extending down from the neck. Draw a slight curve where the body meets the neck.
- Finally, add the arms and hands extending from the body. Draw two slightly curved lines for the arms, and add simple ovals for the hands.
With these easy steps, you can now proudly say that you know how to draw The Cat in the Hat from scratch! Give it a go and have some fun with it. Don’t worry if it’s not perfect on your first try, practice makes perfect!
Tips and Tricks to Make Your Drawing Look Like the Cat in the Hat
Drawing the Cat in the Hat may seem like a daunting task, but with a few key tips and tricks, you can make your drawing look like the real deal.
- Start with the Basic Shapes: To give your drawing a strong foundation, begin by drawing the basic shapes. Start with a large circle for the head, add in ovals for the eyes, and rectangles for the body and hat.
- Pay Attention to Proportions: The proportions of the Cat in the Hat are an essential part of making your drawing look authentic. Be sure to pay attention to the size and shape of each feature, such as the size of the hat compared to the body, and the length and width of the whiskers.
- Add Detail: Once you have the basic shapes in place, it’s time to add some detail to your drawing. Take the time to carefully add in the stripes on the hat and the details on the face and body. Use short, light strokes to add texture and dimension.
- Use the Right Tools: The tools you use can make a big difference in the final look of your drawing. Consider using a combination of pencils and markers to add depth and contrast to your work.
- Practice Makes Perfect: Drawing the Cat in the Hat takes practice. Don’t be afraid to try multiple times before you get it just right. Be patient, and keep practicing until you’re happy with the final result.
By following these simple tips and tricks, you can create a drawing of the Cat in the Hat that looks just like the original. With a little practice and patience, you’ll be a pro in no time.
Conclusion
Drawing the Cat in the Hat can be a fun and exciting activity for both kids and adults. With some practice and patience, anyone can master the techniques needed to draw this beloved character. Let’s recap some of the key points we’ve covered in this guide.
- Sketch lightly: when starting, sketch lightly so you can easily erase any mistakes or lines you don’t want to keep.
- Start with basic shapes: start your drawing with basic shapes such as a circle for the head, ovals for the eyes, and triangles for the ears.
- Add details gradually: add details gradually to your drawing such as the eyebrows, whiskers, and hat. This will help you stay focused on the overall structure and proportion of your artwork.
- Use colors to bring the character to life: once you have completed your drawing, add colors to your Cat in the Hat to bring the character to life! Remember to have fun and don’t be too hard on yourself if you don’t get it right the first time.
In conclusion, learning how to draw the Cat in the Hat is a great way to improve your artistic abilities and bring your favorite characters to life. Follow these simple steps and let your creativity soar!